This post may contain affiliate links. Please see our disclosure policy.
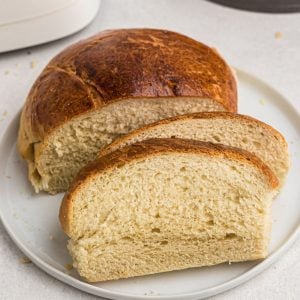
Fresh bread without turning on the oven? Yes, please. This Air Fryer Bread is one of those simple recipes that feels a little magical the first time you make it. With just a few basic pantry ingredients and minimal hands-on time, you can bake a soft, fluffy loaf right in your air fryer.
For more delicous ways to bake with your air fryer, try these air fryer garlic knots next!

⭐️⭐️⭐️⭐️⭐️ Reader Review
“This was so simple and easy to make. It tastes so good. Thank you for sharing this awesome recipe. I will never be without bread again.”
-Betty
Quick Look At This Air Fryer Bread Recipe
- ✨ Flavor: Soft and fluffy with a lightly golden crust and mild buttery flavor that makes it perfect for toast, sandwiches, or warm with butter.
- ⏱️ Prep time: 10 minutes + 30 minutes to proof
- 🔥 Cook time: 10 minutes
- ⏲️ Total time: about 50 minutes
- 👥 Servings: 8
- 🥄 Tools: Air fryer, springform pan, mixing bowl, and optional stand mixer
- ❄️ Freezer-friendly: Yes, you can freeze it for up to two months.
- 👩🏻🍳 Tip: If the top starts browning too quickly, loosely tent the bread with foil so the center can finish baking without over-darkening the crust.
SUMMARIZE AND SAVE THIS CONTENT ON
This Air Fryer Bread recipe keeps things simple. After mixing and shaping the dough, the air fryer does most of the work. The circulating heat creates a lightly golden crust while the inside stays tender and airy—perfect for slicing for sandwiches, toasting for breakfast, or enjoying warm with a generous swipe of butter. My kids love it when I use fresh bread to make air fryer eggs in a basket or air-fried grilled cheese sandwiches.
I’ve tested this recipe many times in my Cosori 5.6-quart basket-style air fryer, adjusting the rise time and temperature to make sure the loaf bakes up consistently soft and fluffy. If you’re using a different model, don’t worry—I’ve included helpful tips below for both basket-style and oven-style air fryers so you can get great results no matter what you have on your counter.
Why Bake Bread in the Air Fryer?
- Faster baking: Air fryers heat quickly, so you can skip the long oven preheat and have fresh bread sooner.
- Golden crust, soft inside: The circulating hot air creates a lightly crisp crust while keeping the inside tender and fluffy. Just like when making my air fryer Irish soda bread!
- Energy-efficient: It uses less energy than a full-size oven and won’t heat up your whole kitchen.

Table of Contents
- Quick Look At This Air Fryer Bread Recipe
- Why Bake Bread in the Air Fryer?
- Ingredients You Will Need
- Air Fryer Bread Variations
- How To Cook Bread in Air Fryer
- Tips for Different Air Fryer Models
- Air-Fried Bread Troubleshooting Tips
- Easy Air Fryer Bread FAQs
- Serving Suggestions
- More Air Fryer Bread Recipes
- Air Fryer Bread Recipe
Ingredients You Will Need
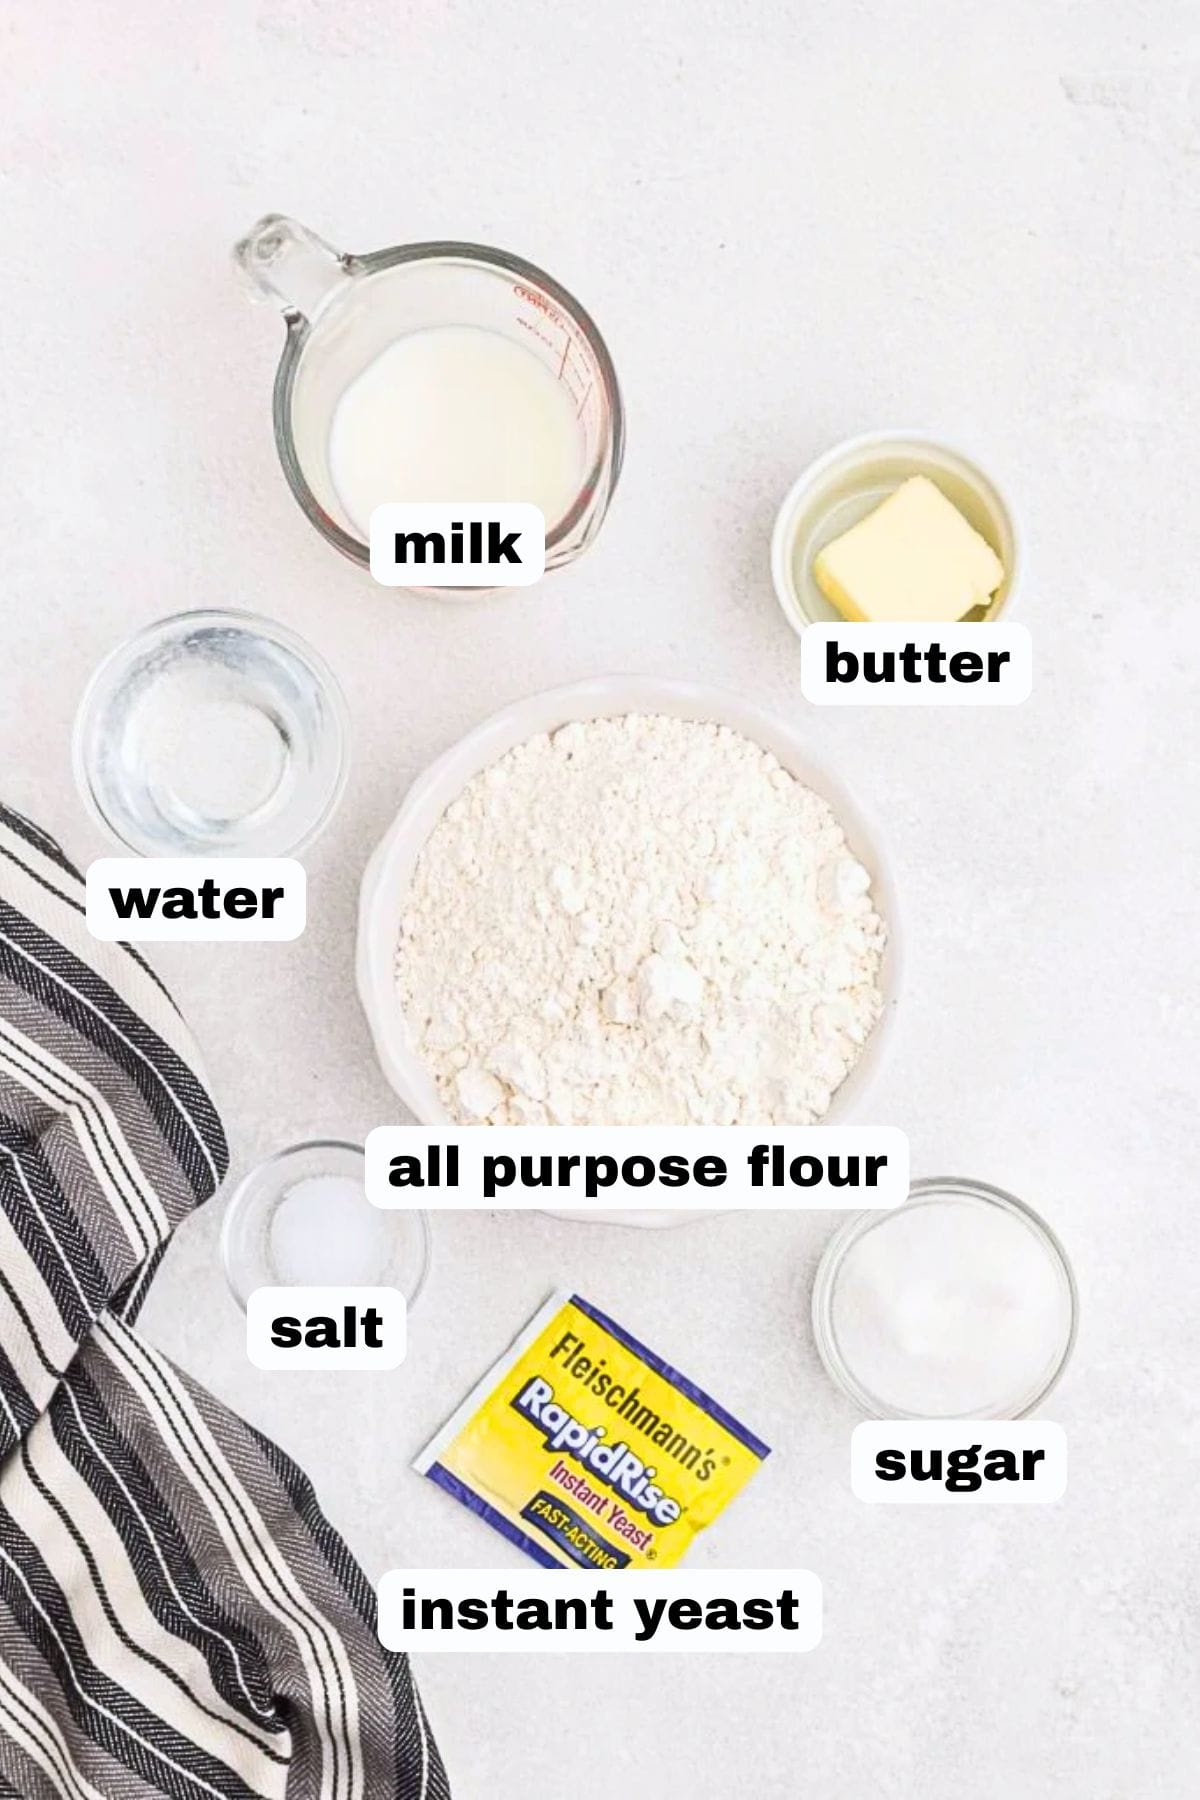
- All-purpose flour: Regular white flour gives this bread its soft, fluffy texture.
- Instant yeast: Helps the dough rise quickly and evenly. If using active dry yeast instead, dissolve it first in the warm water with a pinch of sugar and let it sit for about 5–10 minutes until foamy before mixing it into the dough.
- Granulated sugar: Just a little to feed the yeast and add a touch of flavor.
- Salt: Enhances the overall flavor of the bread and balances the mild sweetness in the dough. It also helps strengthen the gluten structure and keeps the yeast from rising too quickly, which improves the texture of the finished loaf.
- Unsalted butter: Adds rich flavor and helps create a softer, more tender crumb in the finished bread.
Pro Tip: This recipe uses all-purpose flour, which most people have on hand. Bread flour also works — just add 1–2 extra tablespoons of water, as it absorbs more liquid. Bread flour gives a slightly chewier crumb; all-purpose keeps it soft and tender.
A full list of ingredients is included in the recipe card below.
Air Fryer Bread Variations
- Whole wheat version: Swap half the all-purpose flour for whole wheat. You may need to add an extra splash of milk if the dough feels a bit dry. Whole wheat flour tends to absorb more of the liquid.
- Cheesy bread: Mix in ½ cup of shredded cheddar or Parmesan.
- Garlic herb: Add 1 teaspoon of dried Italian herbs and 1 clove of minced garlic to the dough for flavors similar to my air fryer garlic bread.
If you love making this loaf, try my air fryer Yorkshire pudding and air fryer ranch breadsticks next.
How To Cook Bread in Air Fryer

- Combine the warm water and yeast in a bowl. (Warm means about 105°F–110°F — it should feel warm on your wrist but not hot.) Water above 115°F can kill the yeast Let it sit for 3 to 5 minutes until bubbly.
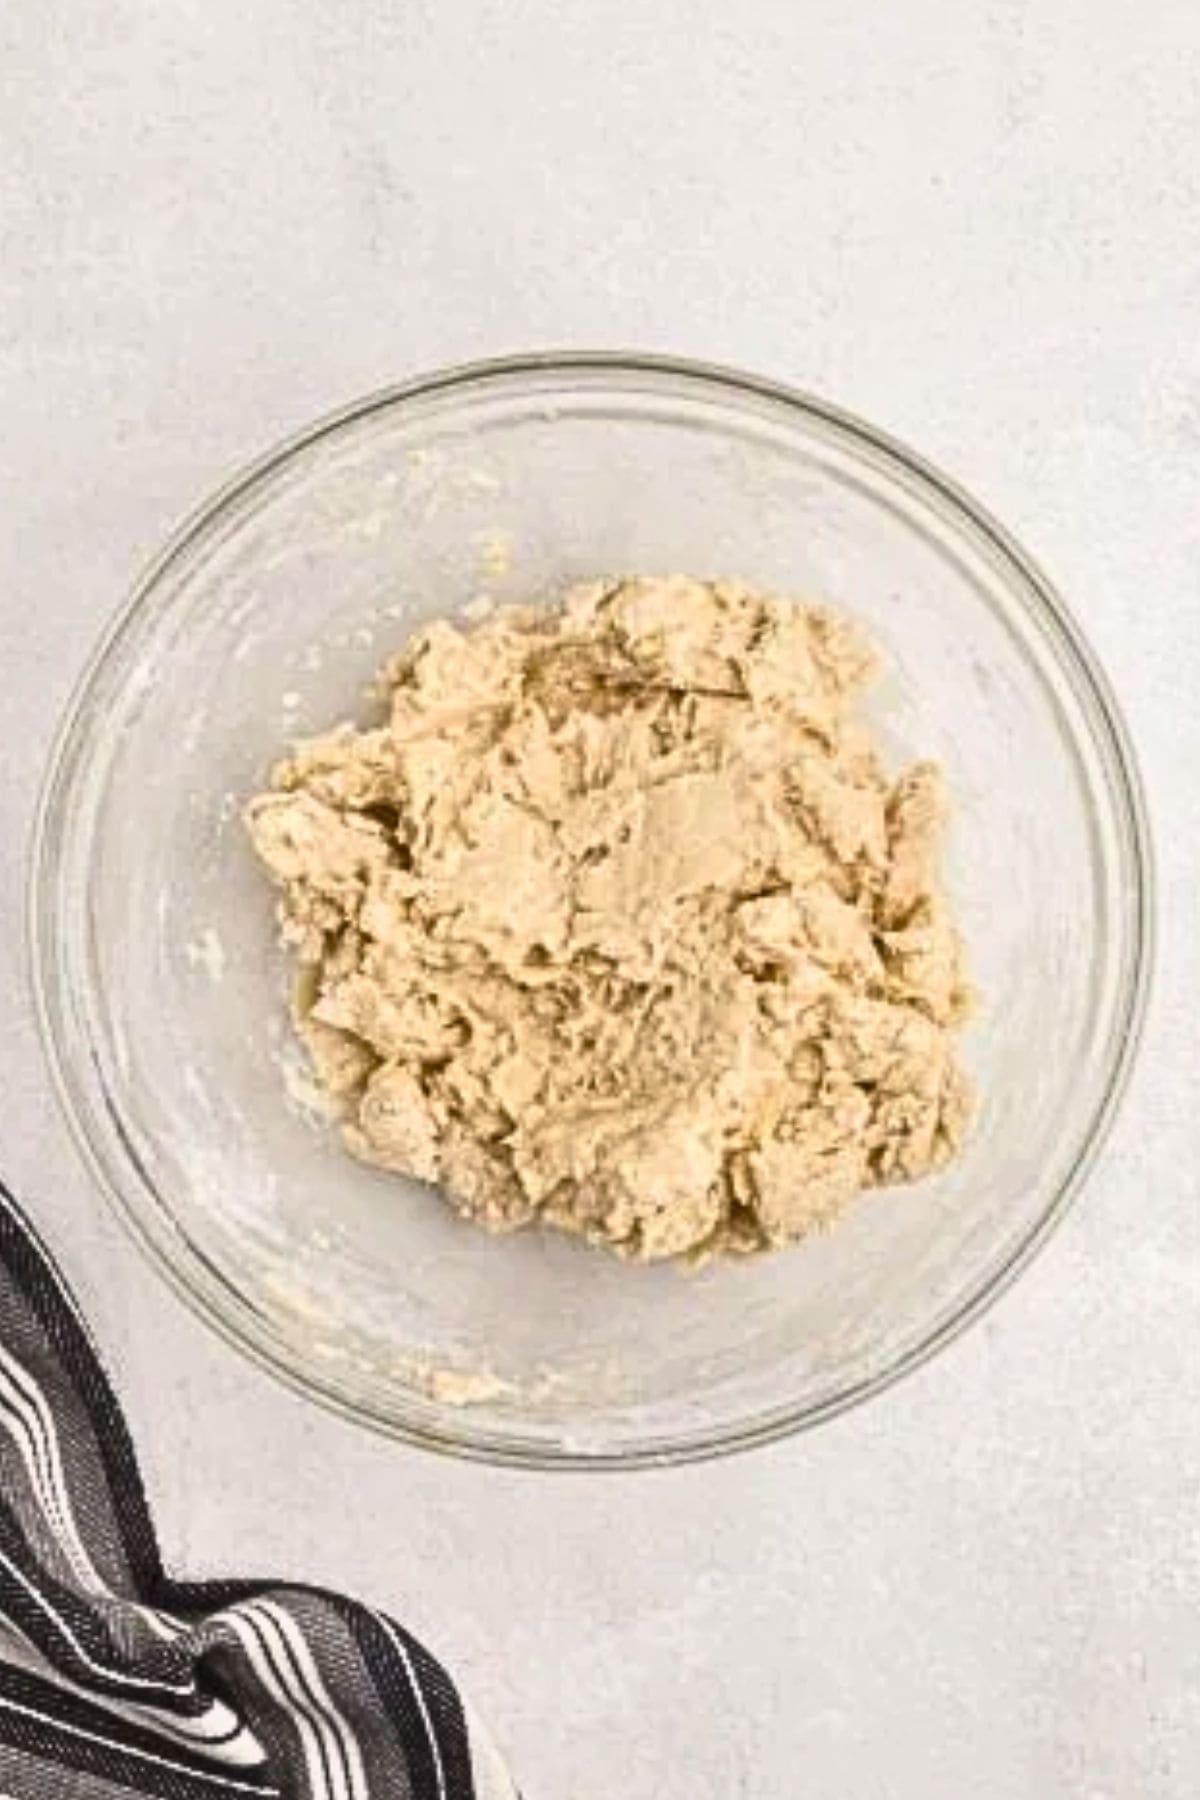
- Add the flour, sugar, salt, milk, and softened butter. Stir until a shaggy dough forms. Knead the dough by hand on a floured surface for 5 to 7 minutes, or use a stand mixer with a dough hook until the dough is smooth and stretchy.

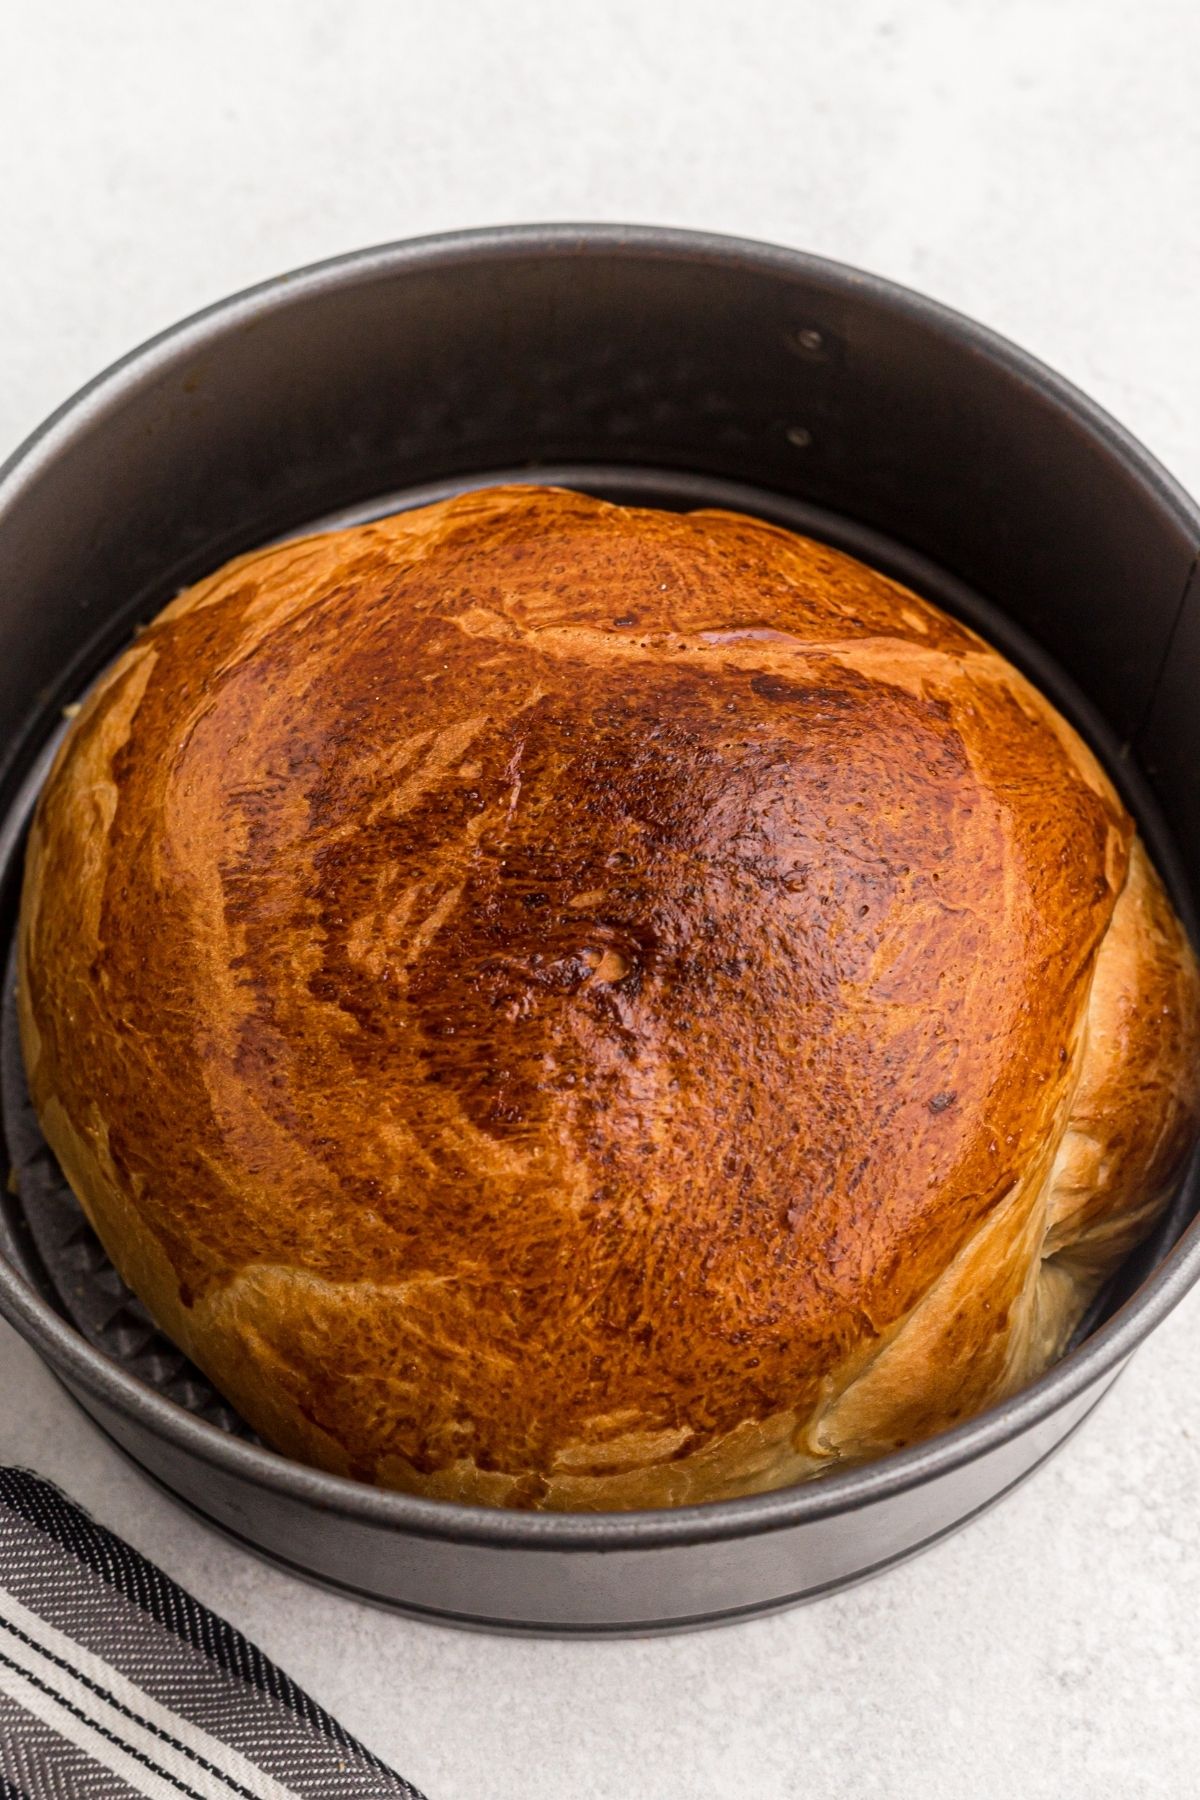
- Place the dough in a lightly oiled bowl, cover with a towel, and let it rise in a warm spot until doubled in size, about 30 to 45 minutes. Punch down the dough and shape it into a ball. Line a small springform pan or oven-safe dish with parchment paper and place the dough inside. Cover and let the dough rise again for 15 to 20 minutes.

- Preheat the air fryer to 320° F. Brush the top of the bread with a whisked egg, then bake the bread for 8 to 10 minutes, or until the top is golden and a toothpick comes out clean. Let the bread cool slightly before removing it from the pan. Transfer to a wire rack to cool completely before slicing. Use it to make an air fryer turkey melt or your favorite sandwich!
How do you know your bread is done? Your bread is done when: the top is deep golden brown, it sounds hollow when you tap the bottom, and an instant-read thermometer inserted in the center reads 190°F to 200°F (88–93°C). This is the most reliable doneness test, especially for first-time bread bakers.
Tips for Different Air Fryer Models
Basket-Style Air Fryers (like the Cosori 5.6-quart)
This recipe was developed and tested in a basket-style air fryer at 320°F. The basket design circulates heat evenly around the pan, which is why you get that consistent golden crust. Follow the recipe as written.
Oven-Style Air Fryers
- Place the pan on the middle rack. The heating element sits at the top in most oven-style models, so the middle rack gives you even heat without over-browning the crust.
- Start checking at 6 minutes rather than waiting the full 8–10, as oven-style models often run hotter and can brown the top faster. If the top is browning faster than the center is cooking, loosely tent with foil and continue baking.
- Pan size: A 7-inch springform pan works well, given the larger interior space of most oven-style fryers.
Air-Fried Bread Troubleshooting Tips
- The top is browning too quickly: Loosely tent the bread with foil partway through cooking. This prevents the top from over-browning while the center continues baking.
- The dough didn’t rise: Check that your yeast is fresh and that the water is warm, not hot. Water that’s too hot can kill the yeast, while cold water may not activate it properly.
- The dough is too sticky to handle: Sprinkle in a little flour while kneading, about one tablespoon at a time, just until the dough becomes smooth and workable.
- The crust is too dark or hard: Some air fryers run hotter than others. Try lowering the temperature to 300°F and adding a few extra minutes of cook time so the bread bakes more gently.
Easy Air Fryer Bread FAQs
Yes! The main difference is that active dry yeast needs to be activated before adding it to the dough. To do this, dissolve the yeast in the warm water from the recipe (about 100–110°F) with a small pinch of sugar and let it sit for 5–10 minutes until it becomes foamy. Once it’s activated, mix it into the dough as directed. The bread will bake the same, though the rise time may take longer than with instant yeast.
A 6-inch or 7-inch springform pan fits most standard basket-style air fryers. Make sure there’s at least an inch of clearance around the pan for proper air circulation.
Store cooled bread in an airtight container at room temperature for up to 3 days, or freeze slices for up to 2 months. Avoid storing it in the refrigerator, which may dry it out.
320°F (160°C) works well for most basket-style air fryers. If your model runs hot or the crust is browning too fast, reduce the temperature to 300°F and add a few extra minutes to adjust for the difference.
The most accurate method is to check the internal temperature using a thermometer. It should reach 190°F to 200°F (88–93°C) in the center. You can also tap the bottom of the loaf: a hollow sound means it’s done. The crust should be deep golden, not pale
Serving Suggestions
This air fryer bread is incredibly versatile and works for everything from breakfast to dinner. Slice it warm and serve with butter or jam alongside your favorite air fryer breakfast recipes, or toast it and use it to make a hearty air fryer breakfast sandwich.
It’s also a great addition to savory meals. Serve slices with soups, salads, or your favorite air fryer side dishes for an easy homemade bread option. During the holidays, this loaf pairs especially well with air fryer turkey breast, making it a simple way to add fresh bread to your Thanksgiving or holiday table.
More Air Fryer Bread Recipes

If you enjoyed this recipe, please consider leaving a STAR ⭐️ RATING in the COMMENTS 📝 SECTION below.
Air Fryer Bread Recipe
Equipment
- Air Fryer
Ingredients
- 2 ¼ teaspoons instant yeast, 1 packet
- ¼ cup warm water, Warm means about 105°F–110°F. It should feel warm on your wrist but not hot. Water above 115°F can kill the yeast
- 2 cups all purpose flour
- 2 tablespoons granulated sugar
- ½ teaspoon salt
- ½ cup milk
- 2 tablespoons unsalted butter, softened
Egg Wash
- 1 large egg, whisked
Instructions
- Add yeast to a bowl with water that is warm. Let the yeast sit in the warm water for about 3 to 5 minutes.
- Once the yeast has activated, add in the flour, sugar, milk, butter, and salt. Gently fold the ingredients together until they were well combined and it becomes slightly flaky.
- Turn the dough onto a floured surface and knead the dough until it is smooth, then shape it into a ball.
- Place the ball of dough into the air fryer basket, and then wrap with plastic wrap or a clean kitchen towel. Allow the dough to rest until it doubles in size, about 30 minutes.
- Brush the top of the loaf with an egg wash. and air fry at 320 degrees Fahrenheit for 8 to 10 minutes, until the top of the bread is golden brown.
Notes
- If your dough didn’t rise, check that the yeast is fresh and the water is warm but not hot, since hot water can kill the yeast and cold water may not activate it.
- If the dough is too sticky to handle, add flour one tablespoon at a time while kneading until it becomes smooth and workable.
- If the crust turns out too dark or hard, your air fryer may run hot, so try lowering the temperature to 300°F and extending the cooking time slightly.
- If the top is browned but the center is still doughy, loosely tent the bread with foil partway through cooking to prevent over-browning while the middle finishes baking.
Nutrition
Nutrition information is automatically calculated, so should only be used as an approximation.


Easy to make! Clear instructions – this was my first attempt at baking a bread and am so happy that I stumbled upon your page! Can’t wait to try your other air fryer recipes!
Thank you! Glad you enjoyed it.
This recipe sounds great. What is the size of your springform pan. I have one as small as 6 inches. Is that small enough or should I use a bigger one?
Hi Susan. I used an 8 inch springform pan. If that will fit in your air fryer, I would recommend using that size. This allows the dough to be spread out a bit more so if using a smaller pan, I don’t know that it would cook properly. Let me know how it goes.
Great tasting. I tried one recipe with a 5 star rating and I actually liked the taste of this one much better. I baked it for 10 minutes, then flipped it over and baked it for additional 5 minutes.
Thanks for the recipe! I love that the proportions are so easy; it’s a great recipe for making in an RV or other small kitchen space. The dough forms up so well and is easy to work with. And, it tastes great!
Like others in the comments, I’m still working out the baking time. First try was in a silicon “pot” @320 for 10 minutes and 6 more minutes out and upside down; still a gooey strip in the center. Second try was a loaf shape on parchment paper @320 for 8 minutes and flipped over for another 6; no goo, but still kind of wet. Next try will be in a tinfoil loaf pan.
Thanks for letting me know! Bread can be tricky, even in a traditional oven, so you are a rock star for trying it in different cooking avenues. Let me know how the loaf pan goes. I just did the loaf shape on parchment paper, and I did flip mine over and that did the trick for perfect bread. If the top is cooked and the center isn’t, you can cover the top with foil so it doesn’t burn and then keep air frying it until the center is done. Hope that helps!
Love all the choices! So quick and easy.
This was so simple and easy to make. It tastes so good. Thank you for sharing this awesome recipe. I will never be without bread again.
You picture has rapid rise, but recipe card has active yeast, which one.
Thanks
Hi Paula. Sorry about that. I fixed it. I did use the rapid yeast to save time for the dough rising.
Oh, and i used plant based milk and coconut oil for the milk and butter.
made this today. yummmmm. i used a ceramic dish to bake in and since i always use a digital thermometer when baking my bread, i did so here. It took 30 minutes to cook to 190F and came out perfect. no idea if the ceramic caused it to cook longer.
Next up is see if i can can use my sour dough starter in place of the yeast, then, the big test, can this be used with gf flour.
i will post after those attempts.
thank you for the recipe.
I have the ninja 300. Just remove the crisp tray and put your bread straight into the drawer just squirt a little oil first to stop it sticking